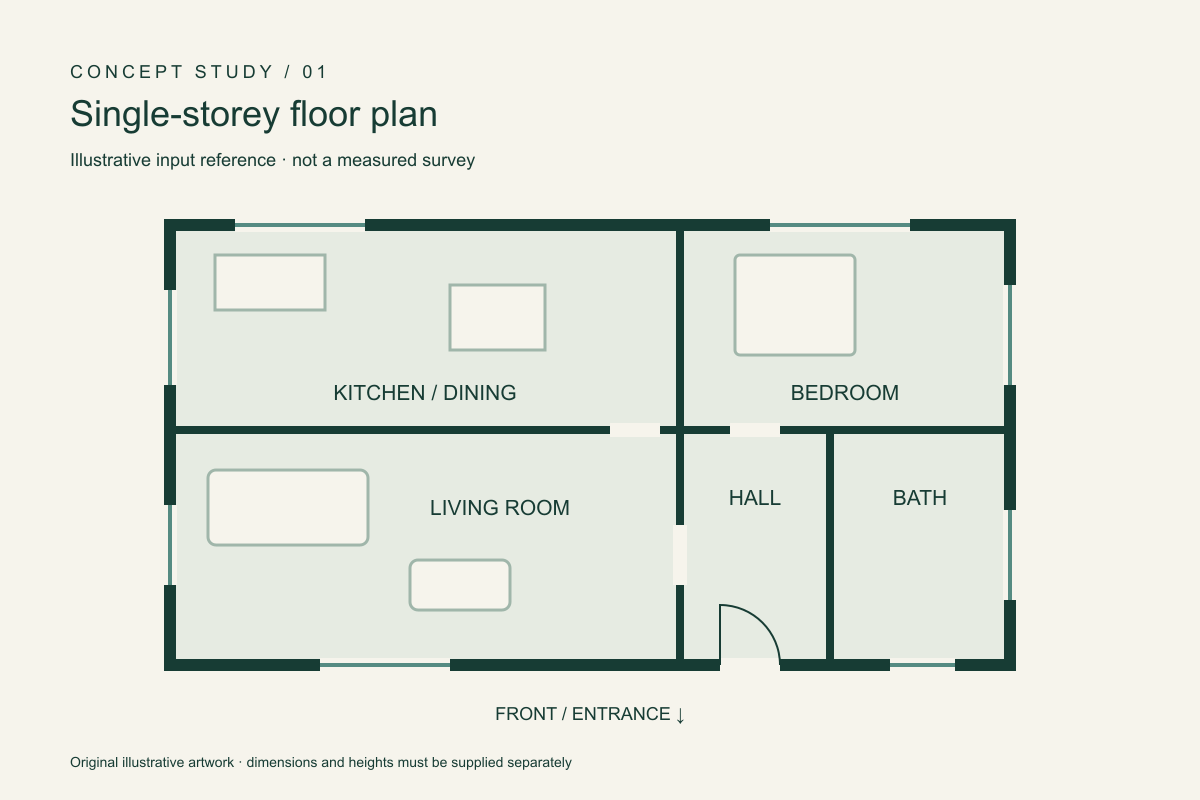
Illustrative Floor Plan Input
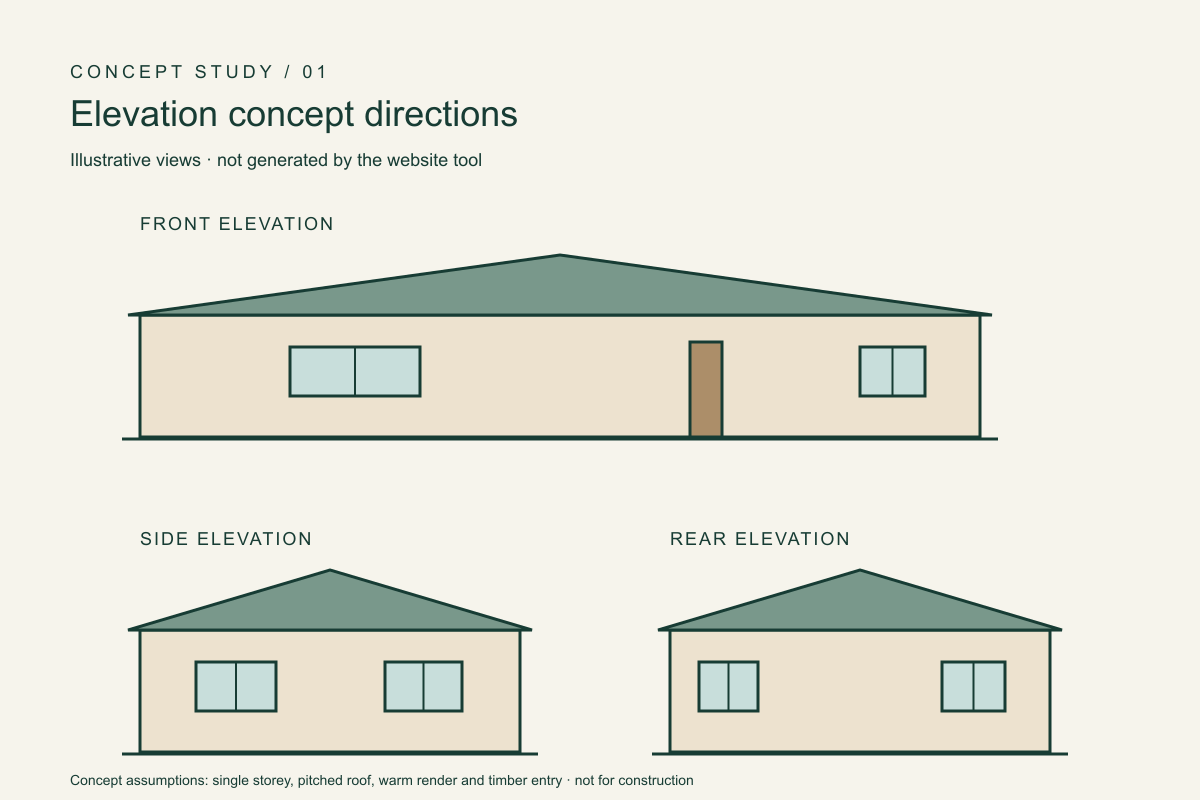
Floor Plan to Elevation reads the footprint on a plan image and sketches a facade from it. Pick a direction, describe the roof and materials, and develop a visual concept in the existing image editor.
Pick a preset for the front, side, or rear, or write your own requirements over the uploaded floor plan. New accounts receive 20 trial credits under the current registration offer; check the displayed cost before generating.
Your elevation concept will appear here. Example artwork is illustrative, not a verified conversion result.
A horizontal layout starts the conversation; heights and materials complete the brief.
A floor plan only shows one floor of the building from above, so use the brief to add what a floor plan alone can’t: opening sizes, roof direction, and facade materials, plus the building height and the side you want to see. The diagrams below illustrate that design direction; they are not measured drawings or results from the generator.
A floor plan drawing next to three illustrative facade directions, showing how a flat layout can translate into a vertical view. This is a study of the brief structure, not a guaranteed sample of tool output.
Define the viewpoint, clarify assumptions, and review the result.
Use the front, side, or rear preset for the floor plan you uploaded — each request targets a single direction at a time.
Add roof, height, window, and material notes to the brief without changing the existing generation workflow.
Check each concept against your source floor plan, and treat unspecified dimensions and structural details as unresolved design decisions.
Use the existing image editor with a dedicated architectural brief.
Use a clear PNG, JPEG, or WebP showing the footprint and openings on the floor plan. Convert document formats to an image of the floor plan separately.
Choose a preset and edit the assumptions, including which edge of the floor plan faces the viewer.
Sign in, review the credit cost for the floor plan you’re working from, and request one concept. Compare the image with the source floor plan before refining the brief.
Practical guidance for visual concepts, trial credits, and input preparation.
It means moving from a horizontal building layout to a vertical view of a facade — here, an image-based concept workflow built on the existing editor rather than a dedicated architectural tool. Describe what your floor plan doesn’t show, such as heights or materials, and use the result to discuss design directions. Treat it as a visual starting point, not a replacement for a measured architectural drawing.
New accounts currently receive 20 registration credits that can support a limited trial, subject to the displayed model cost. You must sign in before generating, and each request needs enough available balance. Once the trial credits are used, further generation follows the normal rules, and download access stays the same as elsewhere on the site.
Choose a clear floor plan image with readable exterior walls, doorways, and windows. If your source is a PDF or drawing file, export it as an image first. Remove private names or addresses you don’t want to upload, and state which edge of the floor plan represents the front so the facade direction lines up with what you expect.
Each preset fills the editable requirements field with a starting direction and generates a concept for that single view, not a coordinated package of four drawings at once. Review one elevation before requesting another, and keep the same assumptions across attempts if you want to compare them side by side.
State the viewpoint, storey count, roof form, approximate heights, and preferred materials, and mention entrances or windows that should stay aligned with the floor plan. Keep instructions consistent rather than combining incompatible alternatives, and save a brief you like so future attempts on the same floor plan can reuse the same assumptions.
No — it cannot recover verified heights from information that’s absent from the uploaded floor plan. Provide the floor height, roof preferences, and opening proportions when you know them, and label any remaining assumptions in your notes. If accurate vertical dimensions matter, get measured information separately before deciding how the building should be documented.
No. This page produces visual concepts, not certified construction documents, structural calculations, or permit-ready drawings. Use it for early discussion and have the relevant details checked independently before physical work begins. Keep the original floor plan and a written list of assumptions alongside the image so reviewers can separate source information from interpretation.
You can describe several storeys in the brief, but the existing editor doesn’t automatically align a stack of separate floor plans into one coordinated model. Check the output for misplaced openings and inconsistent lines between each floor. Complex buildings need more source information and independent review — a plausible image alone doesn’t confirm the floor levels agree.
Compare a small set of material directions — light render, timber accents, or brick — and describe window frames and roof color if they matter to the overall composition. Focus on proportions and placement as well as atmosphere when reviewing a concept, since generated textures are suggestions rather than tested building products. Check real samples separately before choosing a finish.
This workflow uses the existing image result and download controls; it doesn’t add CAD, DXF, SVG, or editable architectural model exports. Treat a result as a reference image for discussion or later drafting. If you need editable linework, create and verify it separately in drafting software rather than assuming a traced image will preserve accurate geometry.
The workflow is a generative interpretation and may alter doors, windows, or proportions even when the prompt asks to preserve them. Repeat the constraints that matter most, then inspect the next result against the same floor plan. More words don’t guarantee a better outcome, and additional attempts use credits — keep useful ideas while treating unresolved differences as limitations, not approved changes to the building.
Document the facade direction you prefer — window rhythm, entrance treatment, roof outline, material palette — and discuss it with the people involved before commissioning detailed work. An elevation image is most useful when it leads to clearer questions and better source information about the actual floor plan. Confirm dimensions and feasibility independently before development continues.